The Pyro-electric Infra-Red (PIR) sensor is an extremely useful device for detecting the presence of a moving body. This is due to its ability to sense the infrared radiation that every living body emits. A PIR sensor is an electronic sensor that measures infrared light radiating from objects in its field of view. Normally this type of sensor would be used as a motion or proximity sensor.
More about PIR Sensor Here!
Wiring diagram:

Arduino Uno Code:
int led = 13; // the pin that the LED is attached to
int sensor = 2; // the pin that the sensor is attached to
int state = LOW; // by default, no motion detected
int val = 0; // variable to store the sensor status
void setup() {
pinMode(led, OUTPUT); // initialize LED as an output
pinMode(sensor, INPUT); // initialize sensor as an input
Serial.begin(9600); // initialize serial
}
void loop(){
val = digitalRead(sensor); // read sensor value
if (val == HIGH) { // check if the sensor is HIGH
digitalWrite(led, HIGH); // turn LED ON
delay(200); // delay 200 milliseconds
if (state == LOW) {
Serial.println("Motion detected!");
state = HIGH; // update variable state to HIGH
}
}
else {
digitalWrite(led, LOW); // turn LED OFF
delay(200); // delay 200 milliseconds
if (state == HIGH){
Serial.println("Motion stopped!");
state = LOW; // update variable state to LOW
}
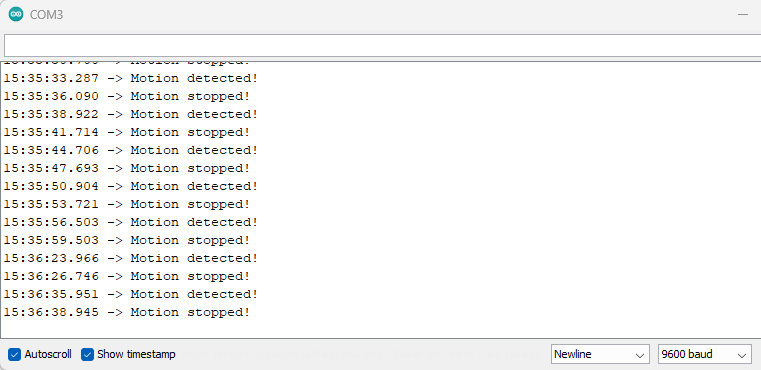
}Sample Output:

This is more connecting a PIR breakout board to an Arduino. The sensor has a board on it that contains all the electronics to operate the actual sensor itself and output a digital signal. I point this out because ever since the RPi and Arduino came out the internet has been over ran with tutorials about how a given sensor works (expecting the actual science of how the physical sensing element works) which amount to little more than “plug power into thd power pin, the ground pin into the ground pin, and the signal pin into your GPIO. Congratulations you have made a sensor” At best a person has learned to plug wires onto pins, and learned nothing about the sensor much less actually built anything. And it’s mainly this lack of actually learning something, having an easy pat on the back sold as achieving creating an interesting and involved system, that I find most abhorrent.
LikeLike